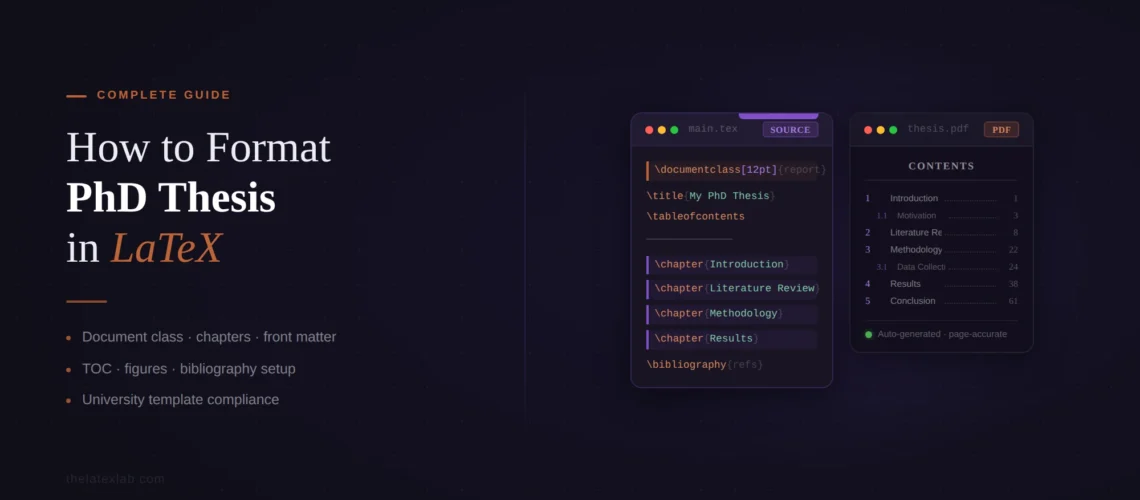
How to Format PhD Thesis in LaTeX (Complete Guide 2026)
If you’re figuring out how to format a PhD thesis in LaTeX, you’re dealing with a document that’s fundamentally different from a journal paper. A thesis has front matter, back matter, multiple numbering schemes, appendices, and formatting rules that vary by university. Whether you’re working on a PhD dissertation or need to format a Masters thesis in LaTeX, the process is the same – but the details trip up nearly everyone. At TheLatexLab, we’ve formatted 200+ theses for universities across the US, Australia, and Germany, and the mistakes we fix are remarkably consistent.
This guide walks through the full thesis formatting process from template selection to final compilation – focusing on the decisions and errors that actually cost you time.
Quick answer: How to Format PhD Thesis in LaTeX?
Start with your university’s official LaTeX template (check the graduate school website or Overleaf gallery). Use the book or report document class. Split your thesis into separate .tex files per chapter. Use \frontmatter / \mainmatter / \backmatter (or manual \pagenumbering{roman} and \pagenumbering{arabic}) to handle page numbering. Build incrementally – compile after every major addition, not at the end. Budget 15-30 hours if you’re doing it yourself for the first time.
📑 In This Guide
- Choosing the Right Thesis Template
- Setting Up Your File Structure
- Front Matter: Title Page, Abstract, Declaration, and TOC
- Page Numbering: Roman and Arabic
- Chapters, Sections, and Appendices
- List of Figures and List of Tables
- Bibliography in a Thesis
- 7 Thesis-Specific LaTeX Errors
- Pre-Submission Formatting Checklist
- Frequently Asked Questions
Choosing the Right Thesis Template
The first decision – and the one that causes the most rework if you get it wrong – is which template to use.
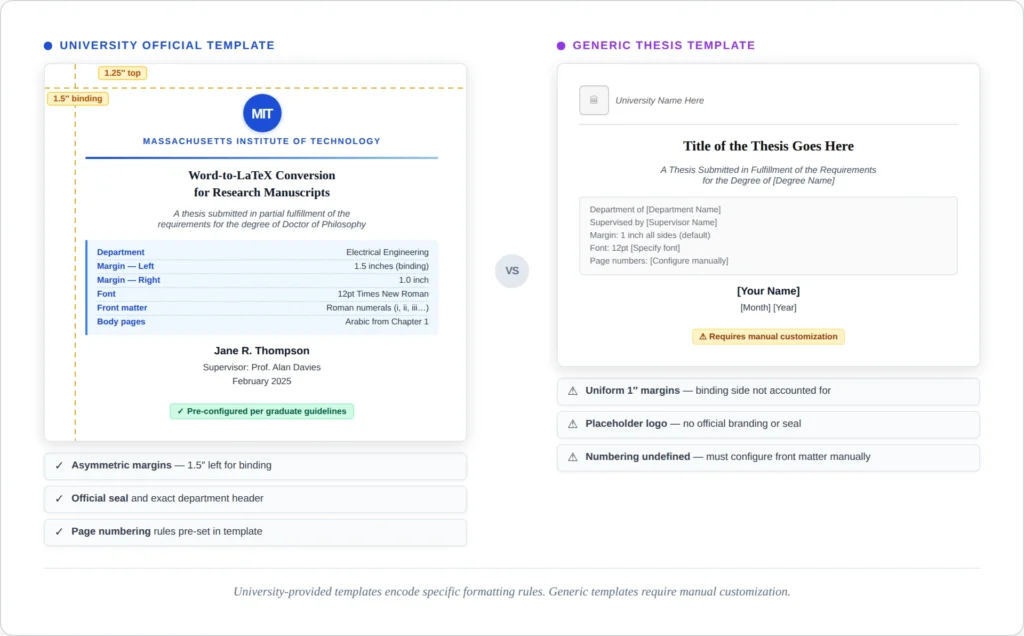
Rule #1: Always check your university’s graduate school website first. Many universities provide an official LaTeX template (often as a .cls file) that encodes their specific formatting requirements – margins, font sizes, heading styles, page numbering, and front matter ordering. Using the official template means the formatting is pre-configured. Using a generic template means you’ll spend hours tweaking margins and spacing to match requirements you could have gotten for free.
Here’s where to find templates for common scenarios:
University-provided templates. Check your graduate school or library website. MIT, Georgia Tech, University of Toronto, TU Delft, and hundreds of others provide maintained templates. These are usually available on the university website and often mirrored on Overleaf’s template gallery. If your university provides one, use it – even if it looks outdated. An ugly official template that passes the format check is better than a beautiful custom one that gets rejected.
Overleaf’s thesis gallery. If your university doesn’t provide a template, Overleaf hosts community-maintained templates for many institutions at overleaf.com/gallery/tagged/thesis. Search by university name. These are unofficial but often used by students at that institution and updated semi-regularly.
Generic thesis templates. If neither option works, the Masters/Doctoral Thesis template by Vel on LaTeXTemplates.com is a solid starting point. It includes all standard front matter components, chapter structure, and bibliography setup. You’ll need to customize margins and formatting to match your university’s requirements.
TheLatexLab insight: About 60% of the thesis formatting projects we receive start with the wrong template. The most common mistake is using a template from a different department within the same university. Engineering and humanities departments at the same school often have different margin, font, and spacing requirements. Always confirm with your graduate school, not just your department.
Setting Up Your File Structure To Format PhD Thesis in LaTeX
A thesis is too large to write in a single .tex file. The standard approach is a main file that pulls in chapter files using \include{} or \input{}.
Here’s a practical file structure that works for most theses:
thesis/
├── main.tex              % Master file - compiles everything
├── preamble.tex          % All \usepackage declarations and settings
├── frontmatter/
│   ├── titlepage.tex
│   ├── abstract.tex
│   ├── declaration.tex
│   ├── acknowledgements.tex
│   └── abbreviations.tex
├── chapters/
│   ├── introduction.tex
│   ├── literature.tex
│   ├── methodology.tex
│   ├── results.tex
│   └── conclusion.tex
├── appendices/
│   ├── appendixA.tex
│   └── appendixB.tex
├── figures/
│   ├── chapter1/
│   ├── chapter2/
│   └── ...
├── references.bib
└── university-thesis.cls  % Your university's class file (if provided)
Why this structure matters: When you’re editing Chapter 4, you don’t want to scroll through 200 pages of text. Separate files let you compile individual chapters during writing (using \includeonly{chapters/results}) and only compile the full document when needed. This can cut your compile time from 2 minutes to 10 seconds during active writing.
The difference between \include{} and \input{}: Use \include{} for chapters because it adds page breaks before and after the included file and works with \includeonly{} for selective compilation. Use \input{} for everything else – preamble files, front matter sections, and anything that shouldn’t force a page break.
Your main.tex file should look something like this:
\documentclass[12pt, a4paper, oneside]{book}
\input{preamble}

\begin{document}

\frontmatter
\input{frontmatter/titlepage}
\input{frontmatter/declaration}
\input{frontmatter/abstract}
\input{frontmatter/acknowledgements}
\tableofcontents
\listoffigures
\listoftables

\mainmatter
\include{chapters/introduction}
\include{chapters/literature}
\include{chapters/methodology}
\include{chapters/results}
\include{chapters/conclusion}

\appendix
\include{appendices/appendixA}
\include{appendices/appendixB}

\backmatter
\bibliographystyle{plain}
\bibliography{references}

\end{document}
TheLatexLab insight: We often receive thesis projects where all content is in a single 300-page .tex file. The first thing we do is split it into chapters. Not only does this make editing manageable, it also makes LaTeX errors dramatically easier to find – you can narrow a compilation failure to a specific chapter in seconds.
Formatting a thesis shouldn’t take longer than writing one.
TheLatexLab’s Thesis Pack handles the full formatting – template setup, front matter, page numbering, bibliography, and compilation testing. We’ve formatted 200+ theses for universities in the US, Australia, and Germany. Two revision rounds included.
Get a free quote for your thesis ->
Front Matter: Title Page, Abstract, Declaration, and TOC
Front matter is everything before Chapter 1. The exact components and their order vary by university, but here’s the typical sequence:
1. Title page. Most university templates provide a pre-built title page. If yours doesn’t, you’ll create one using a titlepage environment. The critical details: your full name (as registered), exact thesis title, degree name (“Doctor of Philosophy” not “PhD”), department, university, and submission date. Check whether your university requires specific wording like “A thesis submitted in partial fulfillment of the requirements for the degree of…”
\begin{titlepage}
\centering
\vspace*{2cm}
{\LARGE\bfseries Your Thesis Title Here\par}
\vspace{1.5cm}
{\large by\par}
{\Large Your Full Name\par}
\vspace{2cm}
{\large A thesis submitted in partial fulfillment \\
of the requirements for the degree of \\
\textbf{Doctor of Philosophy}\par}
\vspace{1cm}
{\large Department of Computer Science \\
University Name\par}
\vspace{1cm}
{\large Month Year\par}
\end{titlepage}
2. Declaration of authorship / originality. Required by most universities. This is a statement that the work is your own, with exact wording usually prescribed by the graduate school. Create it as an unnumbered chapter:
\chapter*{Declaration of Authorship}
\addcontentsline{toc}{chapter}{Declaration of Authorship}
I declare that this thesis and the work presented in it
are my own and have been generated by me as the result
of my own original research...

\vspace{2cm}
\noindent Signed: \hrulefill \\
\noindent Date: \hrulefill
The \addcontentsline command is important – without it, your declaration won’t appear in the table of contents. This applies to every \chapter*{} (unnumbered chapter) in your front matter.
3. Abstract. Usually limited to 300-350 words for a PhD thesis. Same pattern – unnumbered chapter with a TOC entry.
4. Acknowledgements. Same structure. No formatting requirements usually, but keep it under a page.
5. Table of contents, list of figures, list of tables. These are generated automatically:
\tableofcontents
\listoffigures
\listoftables
You don’t write these manually. LaTeX generates them from your \chapter{}, \section{}, \caption{} commands and cross-references. You need to compile twice (or three times) for them to be fully up to date.
Common mistake: Putting the abstract before the declaration when your university requires the reverse. This sounds trivial but it’s a formatting rejection reason. Check the graduate school’s formatting guide for exact ordering.
Page Numbering: Roman and Arabic
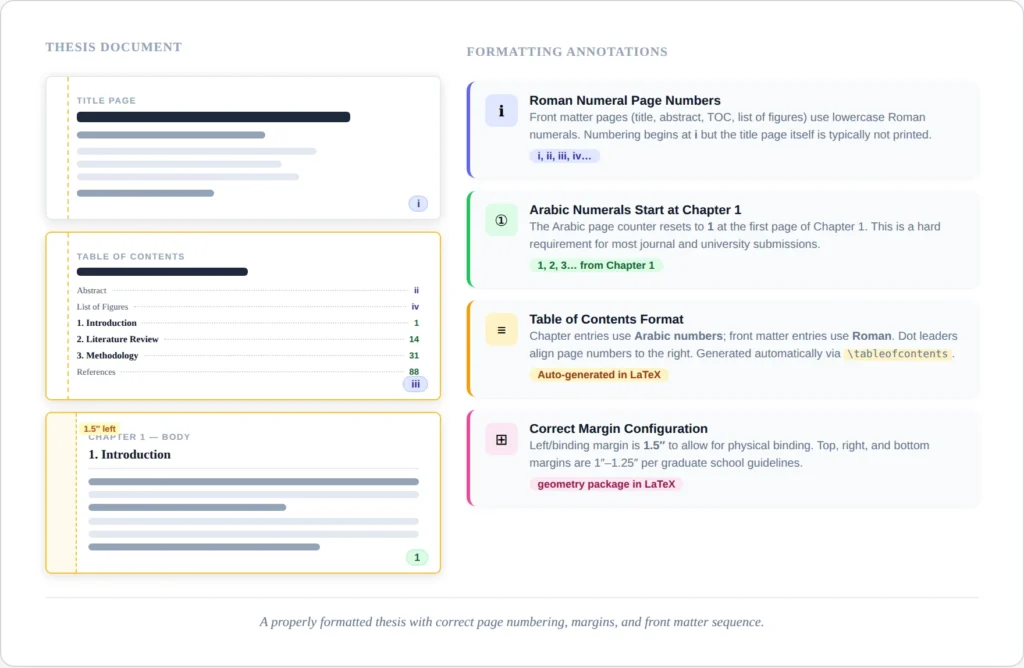
Nearly every university requires lowercase Roman numerals (i, ii, iii, iv…) for front matter and Arabic numerals (1, 2, 3…) starting from Chapter 1. The title page usually has no visible page number but still counts as page i.
If your template uses the book class, this is handled automatically:
\frontmatter   % Switches to Roman numerals, resets counter
% ... all front matter here ...

\mainmatter    % Switches to Arabic numerals, resets counter to 1
% ... chapters here ...

\backmatter    % Keeps Arabic numerals, suppresses chapter numbering
% ... bibliography, appendices ...
If you’re using the report class (which doesn’t have \frontmatter / \mainmatter), you do it manually:
\pagenumbering{roman}
% ... all front matter ...

\pagenumbering{arabic}  % Automatically resets page counter to 1
% ... chapters ...
Suppressing the page number on the title page:
\begin{titlepage}
\thispagestyle{empty}  % No page number on this page
% ... title page content ...
\end{titlepage}
The page is still counted (it’s page i), but no number is printed.
The most common page numbering bug: Your TOC shows “Chapter 1” on page “iii” instead of page “1.” This happens when \mainmatter or \pagenumbering{arabic} is placed after the first \chapter{} command instead of before it. The fix is simple – make sure the numbering switch comes before any chapter content.
TheLatexLab insight: We see this page numbering error in roughly 1 in 4 thesis projects. It compiles without any error message – LaTeX doesn’t know you made a mistake because the code is technically valid. It just looks wrong. Always check your TOC page numbers against the actual PDF pages before submitting.
!– CTA #2 –>
Need your thesis formatted by a deadline?
Upload your document and we’ll send an exact quote within 2 hours. Most thesis projects are delivered in 5-7 business days.
Chapters, Sections, and Appendices
The heading hierarchy in a thesis follows this structure:
\chapter{Introduction}           % Chapter 1
\section{Background}              % 1.1
\subsection{Prior Work}           % 1.1.1
\subsubsection{Specific Topic}    % 1.1.1.1 (use sparingly)
Most universities cap the heading depth at three levels (chapter, section, subsection). Going to \subsubsection is usually a sign that you need to restructure. If your subsection has sub-subsections, consider whether it should be its own section instead.
Cross-referencing chapters and sections: Every heading you want to reference elsewhere needs a \label{}:
\chapter{Literature Review}
\label{ch:literature}

% Later, in another chapter:
As discussed in Chapter~\ref{ch:literature}, the existing
approaches have limitations...
Use a naming convention: ch: for chapters, sec: for sections, fig: for figures, tab: for tables, eq: for equations. The tilde (~) before \ref{} prevents a line break between “Chapter” and the number.
Appendices. The \appendix command switches chapter numbering from numbers to letters:
\appendix
\chapter{Survey Questionnaire}    % This becomes "Appendix A"
\chapter{Additional Data Tables}  % This becomes "Appendix B"
Everything after \appendix is treated as an appendix chapter. Sections within appendices are numbered A.1, A.2, etc. If you want appendices listed in the TOC (most universities require this), they appear automatically since you’re using \chapter{}.
List of Figures and List of Tables
These are auto-generated from your \caption{} commands. Every figure and table that has a caption will appear in the respective list.
\begin{figure}[htbp]
\centering
\includegraphics[width=0.8\textwidth]{figures/chapter3/results-graph}
\caption{Comparison of model accuracy across datasets.}
\label{fig:results-comparison}
\end{figure}
The text inside \caption{} is what appears in the List of Figures. If your caption is long (which it often is in a thesis), use the optional short caption:
\caption[Short caption for LOF]{Full detailed caption that appears
under the figure, explaining the axes, methodology, and key
takeaway from this visualization.}
The text in square brackets appears in the List of Figures. The full text appears under the figure. This keeps your LOF clean and readable.
Common issue: Figures appearing far from where you referenced them. LaTeX’s float placement algorithm ([htbp]) places figures at the top or bottom of a page, or on a dedicated float page – not necessarily where you wrote the code. In a thesis, this is usually acceptable because the text references figures by number (Figure~\ref{fig:results}), not by “the figure below.” If you absolutely need a figure in a specific location, use the float package and [H] placement – but use it sparingly, because forcing placement can create large gaps of white space.
Bibliography in a Thesis
Theses typically have one bibliography at the end (not per-chapter). The two main approaches:
BibTeX (traditional):
% In main.tex, after all chapters:
\bibliographystyle{plain}  % or apalike, ieeetr, etc.
\bibliography{references}
BibLaTeX + Biber (modern):
% In preamble.tex:
\usepackage[backend=biber, style=authoryear]{biblatex}
\addbibresource{references.bib}

% In main.tex, at the end:
\printbibliography[heading=bibintoc]  % bibintoc adds it to TOC
BibLaTeX with Biber is the more modern approach and handles Unicode, complex citation styles, and per-chapter bibliographies (if your university requires them) much better than BibTeX. If you’re starting fresh, use BibLaTeX.
The [?] problem: If your citations show as [?] instead of proper references, you need to run the compilation sequence in the right order: pdflatex → biber (or bibtex) → pdflatex → pdflatex. In Overleaf, this is handled automatically. In a local editor, configure your build tool to run this sequence, or use latexmk which manages it for you.
For a full guide on fixing this and other compilation errors, see our post on common LaTeX compilation errors.
7 Thesis-Specific LaTeX Errors
These are errors that show up specifically in thesis-length documents. They compile fine in a short paper but break when scaled to 200+ pages.
1. TOC shows wrong page numbers. Cause: You need to compile twice after any structural change. The first compilation writes the TOC data to an .aux file; the second reads it back and typesets the TOC. In Overleaf, hit recompile twice. Locally, run pdflatex twice or use latexmk.
2. “TeX capacity exceeded” error. Cause: Too many floats (figures and tables) stacked up without being placed. LaTeX holds unplaced floats in memory, and a thesis can overflow this buffer. Fix: Add \clearpage periodically (e.g., at the end of each chapter section with many figures), or use the morefloats package to increase the limit.
3. Figures or tables appearing in the wrong chapter. Cause: LaTeX floats can drift across chapter boundaries. If you have 10 figures in Chapter 3 and not enough text, some may appear in Chapter 4. Fix: Add \clearpage or \cleardoublepage before each \chapter{} command (most thesis templates do this automatically via \include{}).
4. Bibliography not appearing at all. Cause: The .bib file isn’t being found, or the compilation sequence is wrong. Check that your \bibliography{references} command matches the actual filename (without .bib extension). Check that you’re running bibtex or biber as part of your compilation. In Overleaf, check the logs for biber warnings.
5. Overfull \hbox warnings on every page. Cause: In a 200-page document, LaTeX’s line-breaking algorithm occasionally can’t find a good break. A few overfull warnings are normal. Excessive warnings (50+) usually mean you have long unbreakable strings – URLs, file paths, or inline code. Fix: Use the url package for URLs, \texttt{\-} for breakable monospace text, or add \sloppy to problematic paragraphs (not globally).
6. Appendices numbered as chapters (Chapter 6 instead of Appendix A). Cause: Missing \appendix command before your appendix chapters. This is a single-line fix, but we see it in about 15% of thesis projects.
7. Cross-references showing “??” instead of numbers. Cause: Compile twice. If it persists, check that every \ref{} has a matching \label{} with the same key. LaTeX is case-sensitive – \label{fig:Results} and \ref{fig:results} won’t match.
Skip the formatting. Focus on your research.
TheLatexLab has formatted 200+ PhD and Masters theses for universities across the US, Australia, and Germany. Every file is compilation-tested in Overleaf before delivery.
Pre-Submission Formatting Checklist
Before you submit, work through this list. These are the items that cause formatting rejections at the graduate school level.
Page numbering: Open your compiled PDF. Check that front matter uses Roman numerals, Chapter 1 starts on Arabic page 1, and the title page has no visible number. Check that your TOC page numbers match the actual PDF page numbers.
Margins: Most universities require 1-inch margins on all sides, or 1.5 inches on the binding side (left margin for single-sided printing). Measure the actual PDF, not what your code says – some packages silently override geometry settings.
Front matter ordering: Compare your front matter sequence against your graduate school’s formatting guide. The order matters and varies by institution.
TOC completeness: Check that all front matter items (abstract, declaration, acknowledgements), all chapters, all appendices, and the bibliography appear in the table of contents. Unnumbered chapters need explicit \addcontentsline entries.
Figures and tables: Verify that every figure and table has a caption and appears in the List of Figures / List of Tables. Check that no floats have drifted into the wrong chapter.
Bibliography: Check for [?] citations. Check that all bibliography entries have complete information (no missing years, publishers, or page numbers). Check that the citation style matches your department’s requirements.
Cross-references: Search your PDF for “??” – this reveals any broken references. Check that “Chapter 3” links to the actual Chapter 3, not to Chapter 2 because you reordered sections.
Compilation: Do a clean compilation – delete all .aux, .toc, .lof, .lot, .bbl, .log files and compile from scratch (pdflatex → biber → pdflatex → pdflatex). This catches any stale cross-references from earlier edits.
Frequently Asked Questions
If you’re new to LaTeX, expect 20-40 hours spread over several weeks. The bulk of the time goes into learning the basics (5-10 hours), setting up the template and front matter (3-5 hours), formatting figures and tables (5-10 hours), and debugging compilation errors (5-15 hours). If you already know LaTeX from writing journal papers, it’s more like 10-15 hours because the thesis-specific parts (front matter, page numbering, appendices) are new but the fundamentals aren’t.
Usually yes, if they’re at the same university. Most university thesis templates work for both Masters and PhD – the structure is identical, and the only differences are the degree title on the title page and sometimes the required front matter components (PhD theses often require a declaration of originality that Masters theses don’t). Check with your graduate school to confirm. If you’re using a generic template, the same template works for both – just update the degree name.
If your thesis contains significant mathematics, complex tables, many cross-references, or a large bibliography (100+ sources), LaTeX handles these much better than Word. Word struggles with automatic numbering across 200+ pages and tends to corrupt long documents. If your thesis is primarily text with minimal equations, Word is simpler. Also check whether your university provides a LaTeX template – if they do, it’s a strong signal that LaTeX submissions are well-supported. For a deeper comparison, see our post on whether to learn LaTeX or hire someone.
This almost always means you need to compile your document again. LaTeX writes TOC data to an auxiliary file on the first pass, then reads it back on the second. After any structural change (adding chapters, moving sections, adding figures), compile twice. If you’re using Overleaf, click Recompile twice. If using latexmk locally, it handles multiple passes automatically. If the numbers are still wrong after double compilation, check that your \pagenumbering{arabic} command comes before your first \chapter{}, not after.
Professional LaTeX thesis formatting services typically range from $199-$599 for a full thesis, depending on length, number of figures and tables, equation complexity, and the target university template. At TheLatexLab, our Thesis Pack includes full conversion from Word or PDF, template setup, front matter formatting, bibliography, and two revision rounds. We provide an exact quote after reviewing your document – submit yours here for a quote within 2 hours.
Overleaf works well for most theses and requires zero installation. It compiles in the cloud, handles package management automatically, and lets your supervisor review and comment directly. The main limitation is the compile timeout on the free plan – very large theses (300+ pages with many TikZ figures) can exceed it. If you hit timeout issues, the paid plan has a higher limit, or you can install TeX Live locally and use an editor like TeXstudio or VS Code with the LaTeX Workshop extension. Many universities provide free Overleaf Professional accounts for students – check with your IT department.