How to Convert Word to LaTeX for Elsevier (elsarticle Step-by-Step)
If you need to convert Word to LaTeX for Elsevier, this guide covers every step from choosing the right template to uploading your files to Editorial Manager without errors. Elsevier is the world’s largest academic publisher, and their LaTeX setup has a wrinkle most researchers do not expect: there are three different document classes (elsarticle, cas-sc, and cas-dc), three different bibliography style files, and an upload system that rejects perfectly valid LaTeX for reasons that have nothing to do with your content. Getting the latex manuscript conversion for Elsevier right means understanding these Elsevier-specific requirements before you write a single line of code.
The short version
Template: Most Elsevier journals use elsarticle.cls (v3.4c, 2025). If your journal requires a graphical abstract or highlights, it likely uses cas-sc.cls (single column) or cas-dc.cls (double column) instead. Check your journal’s Guide for Authors before starting.
Conversion method: Manual transfer into the elsarticle template is the only reliable approach. Automated tools cannot apply the correct Elsevier citation scheme or produce Editorial Manager-compatible file structures.
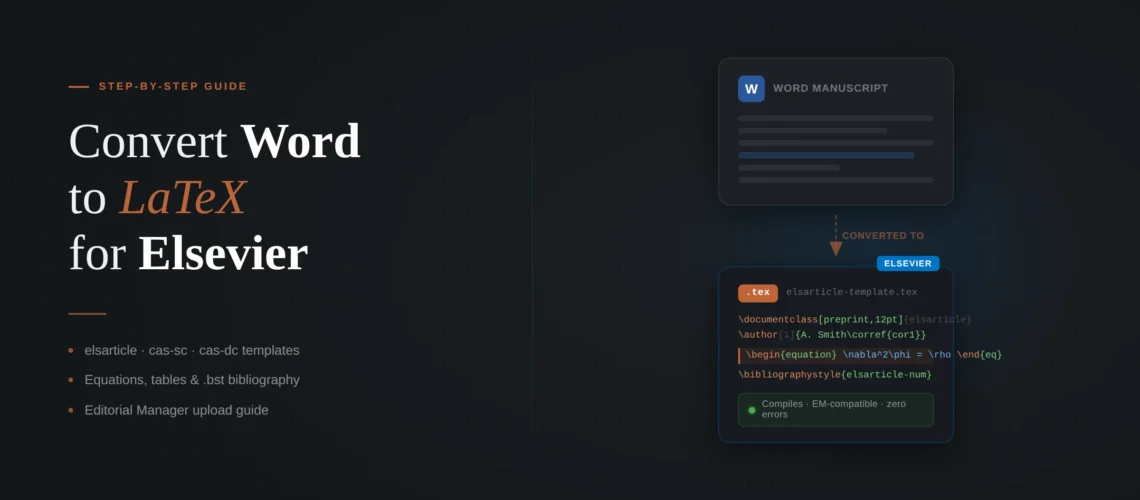
Key pitfall: Elsevier’s Editorial Manager runs TeX Live 2022. It rejects subfolders, handles PNG images inconsistently, and requires files to be labeled with specific item types during upload. A paper that compiles in Overleaf can fail on EM for purely structural reasons.
Fastest option: A professional Word to LaTeX conversion service delivers Elsevier-ready files in 72 hours – template applied, bibliography formatted, and Editorial Manager upload tested.
In this guide:
- elsarticle vs cas-sc vs cas-dc: which template your journal needs
- Before you start: what to prepare from your Word file
- Step-by-step conversion walkthrough
- Converting Word equations for elsarticle
- Setting up your bibliography with the right Elsevier .bst file
- Elsevier submission errors that have nothing to do with your LaTeX
- Uploading to Editorial Manager without failures
- Frequently asked questions
elsarticle vs cas-sc vs cas-dc: which template your journal needs
Elsevier does not have one LaTeX template. They have three active document classes, plus a legacy camera-ready package. Choosing the wrong one does not always cause a compilation error – sometimes it compiles fine but produces output that the production editor rejects, and you have to redo the conversion from scratch.
elsarticle.cls (current version: v3.4c, 2025) is the standard template for the majority of Elsevier journals. It supports three citation schemes: numbered (elsarticle-num), author-year/Harvard (elsarticle-harv), and numbered with author names (elsarticle-num-names). If your journal’s Guide for Authors does not mention graphical abstracts, highlights, or CAS, use elsarticle.
cas-sc.cls and cas-dc.cls are newer Elsevier classes for journals that use the Complex Article Service (CAS) workflow. cas-sc is for single-column layout, cas-dc for double-column. These templates handle more complex frontmatter than elsarticle – including structured author credit statements, graphical abstracts as a formatted element (not just an uploaded image), and highlight bullet points built into the template. If your journal’s submission page asks for any of these elements, it likely expects CAS rather than standard elsarticle.
ecrc.sty is an add-on for camera-ready copy (CRC) journals like the Procedia series, where your formatted manuscript is reproduced exactly as submitted. CRC journals are rare. If your journal is CRC, it will say so explicitly in the instructions.
Here is how to confirm which template your journal uses: go to your journal’s page on the Elsevier website, click “Guide for Authors,” and look for the LaTeX section. If it links to the standard elsarticle package, use elsarticle. If it mentions “CAS” or provides links to cas-sc/cas-dc, use those. If still unclear, look at recently published articles in the journal – the formatting of the frontmatter (particularly the author block and abstract structure) will tell you which class was used.
Before you start: what to prepare from your Word file
Spend 20 minutes extracting and organizing these components before opening a .tex file. This prevents the back-and-forth between Word and LaTeX that eats hours during conversion.
Author metadata. elsarticle structures author information differently from Word. Each author gets a separate \author command with email, ORCID, and affiliation tags. Corresponding author is marked with \cormark[1]. Write out every author’s full name, email, ORCID, and full affiliation address. For the CAS templates, you also need each author’s credit contribution statement (CRediT roles like “Conceptualization,” “Methodology,” etc.).
Equations. Count your equations and note which use multi-line alignment, matrices, or unusual notation. MathType equations need manual rewriting. Word’s built-in equation editor output is unreliable for automated conversion. See the dedicated equations section below.
Tables. Elsevier follows standard booktabs conventions: no vertical lines, \toprule/\midrule/\bottomrule for horizontal rules, captions above tables. Note any tables with merged cells or spanning the full page width.
Figures. Export every figure as a separate file. Here is a detail that trips up many Elsevier submissions: Editorial Manager handles PNG files inconsistently and can fail to compile them. Convert all figures to PDF or EPS format before starting your conversion. For photographs, high-resolution JPEG also works. Extract images from your .docx file by renaming it to .zip and finding them in the word/media folder.
References. Export from your reference manager (Zotero, Mendeley, EndNote) to BibTeX format. If you typed references manually in Word, you will need to create .bib entries from scratch – the most tedious part of any conversion.
Would rather skip the manual conversion?
Upload your Word document and tell us the target Elsevier journal. We handle the template selection, equation typesetting, bibliography formatting, figure conversion, and Editorial Manager compatibility testing. Delivered in 72 hours with zero compilation errors.
Step-by-step Convert Word To Latex for Elsevier Walkthrough
Step 1: Set up the elsarticle template. Go to Overleaf’s elsarticle template and open it directly, or download the package from Elsevier’s LaTeX instructions page. The package includes elsarticle.cls, three sample .tex files (one for each citation scheme), three .bst files, and documentation.
Step 2: Pick the right sample file. Unlike Springer where you uncomment a line, Elsevier provides three separate template files. Choose the one matching your journal’s citation style:
elsarticle-template-num.tex      - Numbered citations [1]
elsarticle-template-harv.tex     - Author-year (Author, 2024)
elsarticle-template-num-names.tex - Numbered with names [1, Smith]
To find your journal’s citation style: open the Guide for Authors on the Elsevier website and search for “reference style” or “citation.” If it says “numbered,” use the num template. If it says “name-date” or “Harvard,” use harv. If still unsure, open a recent article in the journal and check whether citations appear as numbers or author-year pairs.
Step 3: Choose your document class options. elsarticle supports several layout options:
\documentclass[preprint,12pt]{elsarticle}     - Single column, for submission
\documentclass[review,12pt]{elsarticle}        - Double-spaced, for peer review
\documentclass[final,1p,times]{elsarticle}     - Single column, final layout
\documentclass[final,3p,times]{elsarticle}     - Intermediate width
\documentclass[final,5p,times,twocolumn]{elsarticle} - Two-column, journal style
For initial submission, use [preprint,12pt] or [review,12pt] unless your journal’s Guide for Authors specifies otherwise. Do not use [final] options for initial submission – they apply the journal’s published layout, which can cause pagination issues on Editorial Manager.
Step 4: Fill in the author block. elsarticle’s author metadata structure:
\author[1]{First Author\corref{cor1}}
\ead{first.author@university.edu}
\cortext[cor1]{Corresponding author}

\author[1,2]{Second Author}
\ead{second.author@university.edu}

\affiliation[1]{organization={Department of Physics},
  addressline={123 University Ave},
  city={Boston}, state={MA}, postcode={02115},
  country={USA}}
\affiliation[2]{organization={Research Institute},
  city={Berlin}, country={Germany}}
Note: the \affiliation command with structured fields (organization, city, country) is the modern elsarticle syntax. Older templates used \address. Use the structured format – it maps correctly to Elsevier’s production metadata.
Step 5: Transfer your body text. Copy text from Word section by section. Replace headings with \section{}, \subsection{}, \subsubsection{}. Clean up Word artifacts: smart quotes (replace with straight quotes or ``...''), non-breaking spaces, tab characters, and special characters (%, &, #, _ must be escaped as \%, \&, \#, \_).
Step 6: Convert equations. See the dedicated section below.
Step 7: Build tables. Use \begin{table} with booktabs commands. Caption goes above the table. elsarticle loads graphicx automatically but not booktabs – add \usepackage{booktabs} to your preamble.
Step 8: Add figures. Upload figure files (PDF or EPS, not PNG) to your Overleaf project root – not in a subfolder. Use \includegraphics{filename} without any directory path. This is critical because Editorial Manager cannot process files in subfolders.
Step 9: Set up the bibliography. See the dedicated section below.
Step 10: Compile and verify. Compile with pdfLaTeX in Overleaf. Compare the output against your Word original: every equation, every table, every figure, every reference. Fix all errors and warnings – Overleaf generates a PDF even with errors, but Editorial Manager stops at the first error and produces only an error log. For general LaTeX debugging help, see our guide on common LaTeX compilation errors.
Converting Word equations for elsarticle
elsarticle loads amsmath automatically, so you have access to all standard AMS math environments: equation, align, gather, multline, and their starred (unnumbered) variants.
Word’s built-in equation editor stores equations in OMML format. No tool converts this reliably to LaTeX. You need to rewrite each equation manually. Simple inline expressions transfer directly ($x^2 + y^2$), but multi-line equations, matrices, and piecewise functions need to be rebuilt in the appropriate AMS environment.
MathType equations can be batch-exported. Select all equations in Word via MathType > Convert Equations, then export to LaTeX. The output typically needs cleanup: spacing commands, alignment operators, and Elsevier-specific package compatibility.
Elsevier-specific math detail: elsarticle uses natbib internally for citation management. If you are also using amsmath theorem environments, define them in your preamble with \newtheorem – elsarticle does not provide pre-defined theorem environments like Springer’s sn-jnl does. You need to set them up yourself:
\newtheorem{theorem}{Theorem}
\newtheorem{lemma}[theorem]{Lemma}
\newtheorem{definition}{Definition}
For equation-heavy papers (15+ equations), the conversion time for this section alone is typically 5-10 hours. If your deadline is tight, a professional service can handle the Word to Latex Conversion for Elsevier with every equation in proper math mode and zero compilation errors.
Setting up your bibliography with the right Elsevier .bst file
Elsevier provides three bibliography style files, and using the wrong one is one of the most common reasons Elsevier submissions get sent back during production – not during review, but after acceptance, when it is most frustrating.
elsarticle-num.bst – Numbered references. Citations appear as [1], [2], etc. Used by the majority of Elsevier STEM journals.
elsarticle-harv.bst – Author-year/Harvard style. Citations appear as (Smith et al., 2024). Common in social sciences, ecology, and some biomedical journals.
elsarticle-num-names.bst – Numbered with author names. Citations appear as [1, Smith et al.]. Less common, used by specific journals.
Your .bst choice must match the document class option. If your template file uses \documentclass[...authoryear]{elsarticle}, you must use elsarticle-harv.bst. If it uses the default (no authoryear option), use elsarticle-num.bst. Mixing these causes either compilation errors or – worse – citations that compile but format incorrectly.
If your references are in a reference manager: Export to BibTeX (.bib). Check for missing DOIs, inconsistent author name formatting, and incomplete entries. Google Scholar BibTeX exports are particularly unreliable – always verify against the actual publication. Use JabRef for a GUI-based BibTeX editor that validates entries.
If your references are typed manually in Word: Create a .bib file entry for each reference. For a 30-reference paper, budget 60-90 minutes. Each entry needs the correct type (@article, @book, @inproceedings) and all required fields for the chosen .bst style.
Critical detail for Editorial Manager upload: When you upload your .bib file to EM, label it as “Manuscript” item type – not “LaTeX source file” or any other category. This is one of the most common upload errors and causes EM to silently ignore the .bib file during compilation, producing question marks instead of citations. We have seen researchers reformat their entire bibliography trying to fix this when the problem was just the file label.
Bibliography conversion taking too long?
We rebuild every reference in clean BibTeX with DOIs, correct entry types, and the right Elsevier .bst style. Your bibliography will compile correctly on both Overleaf and Editorial Manager.
Elsevier submission errors that have nothing to do with your LaTeX
These are not LaTeX errors. Your code is fine. These are Editorial Manager errors caused by the way Elsevier’s system processes files – and they are the most frustrating part of the submission process because they appear after you have already spent hours getting your document to compile perfectly in Overleaf.
Subfolders break everything. If your Overleaf project organizes figures in a /figures folder and your .tex references them as \includegraphics{figures/myimage.pdf}, it compiles perfectly in Overleaf and fails completely on EM. Editorial Manager cannot process LaTeX submissions with directory structures. Move all files to the root level and remove all folder paths from your \includegraphics commands.
PNG images fail silently. EM handles PNG inconsistently. A submission with PNG figures may compile on some days and fail on others, or compile but render images at incorrect resolution. Convert all images to PDF or EPS before uploading. This is not a LaTeX issue – it is an EM processing issue.
Wrong file item types cause phantom errors. When uploading to EM, every file must be assigned the correct item type. Your .tex, .bib, .bst, .sty, and .bbl files should all be labeled as “Manuscript.” Images should be labeled as “Figure.” If you label your .bib file as anything else, EM ignores it during compilation and you get question marks throughout your references – even though the file is physically present in your submission.
Reserved filenames cause silent failures. Windows reserved names like CON, PRN, AUX, NUL, COM1-COM9, and LPT1-LPT9 cannot be used as filenames in EM – even with different extensions. If you have a file named aux.tex or con.bib, rename it.
elsarticle.cls version mismatch. EM uses TeX Live 2022, which includes a specific version of elsarticle.cls. If your document uses commands from a newer version, EM will fail. The workaround is to upload your own copy of elsarticle.cls alongside your manuscript files, ensuring the version matches what your document expects. This is especially relevant if you downloaded the template recently and Elsevier has updated the class file since EM’s TeX Live was frozen.
Uploading to Editorial Manager without failures
Once your document compiles with zero errors and zero warnings in Overleaf, follow this upload sequence for Editorial Manager:
1. Flatten your file structure. Move every file – .tex, .bib, .bst, .cls, .sty, figures – to a single folder. No subfolders. No nested directories.
2. Convert all PNG figures to PDF. Open each PNG in any image editor and export as PDF, or use a batch converter. Update all \includegraphics references in your .tex file to match the new filenames.
3. Remove all directory paths. Search your .tex file for any \includegraphics command containing a folder path (like figures/ or ./images/) and remove the path, leaving only the filename.
4. Upload in the correct order with correct item types. Upload your .tex file first as “Manuscript.” Then upload .bib, .bst, .sty, and any custom .cls files – all as “Manuscript.” Upload figures as “Figure.” Upload tables in .tex format as “Manuscript.”
5. Build the PDF and check it. After uploading, EM compiles your files and generates a proof PDF. If compilation fails, EM shows a TeX error log instead of a PDF. Read the error log carefully – it will point to the specific line causing the failure. If the PDF generates but looks wrong (missing figures, question marks for references, broken formatting), go back and check your file item types and paths.
If you have done all of this and EM still produces errors, there may be a TeX Live version incompatibility. Try uploading your own copy of elsarticle.cls from the version you compiled against. For more detailed Editorial Manager troubleshooting, see Elsevier’s official LaTeX FAQ.
Ready to submit to Elsevier?
We convert Word to Elsevier-ready LaTeX for 130+ Elsevier journals. elsarticle or CAS template applied, correct .bst style, every equation in proper math mode, and Editorial Manager compatibility verified before delivery. From $149.
Frequently asked questions
Yes, most Elsevier journals accept Word submissions. Many accept a PDF at initial submission and only require LaTeX source files after acceptance or during revision. Check your journal’s Guide for Authors. If it says “LaTeX preferred” but also accepts Word, and your paper has minimal equations, submitting in Word may be the simpler path.
Check the journal’s Guide for Authors on the Elsevier website. If it mentions graphical abstracts as a formatted template element (not just an uploaded image), highlights, or CRediT author statements built into the template, the journal likely uses cas-sc.cls or cas-dc.cls. If the Guide links to the standard elsarticle package without mentioning CAS, use elsarticle. You can also check recently published articles – CAS journals have a visually distinct frontmatter layout.
This almost always means your .bib file was not labeled correctly during upload. In Editorial Manager, .bib files must be uploaded with the “Manuscript” item type. If they are labeled as anything else, EM ignores them during compilation. Re-upload the .bib file with the correct item type and rebuild the PDF.
Three common causes: (1) Your Overleaf project uses subfolders for figures or other files – EM requires everything in a flat folder structure. (2) You have PNG images that EM cannot process consistently – convert to PDF or EPS. (3) Your document uses a newer elsarticle.cls than what EM’s TeX Live 2022 includes – upload your own copy of elsarticle.cls alongside your manuscript.
For a first-time LaTeX user, expect 12-30 hours for a 12-15 page paper with equations, tables, and 30+ references. Experienced users can do it in 4-8 hours. The bibliography and equation conversion are the most time-consuming parts. A professional conversion service typically delivers in 48-72 hours.
For initial submission, use [preprint,12pt] for standard single-column output, or [review,12pt] if the journal requires double-spaced manuscripts for peer review. Do not use the [final] options for initial submission – they apply the journal’s published layout and can cause pagination issues on Editorial Manager.